Two point Perspective GeoGebra Lab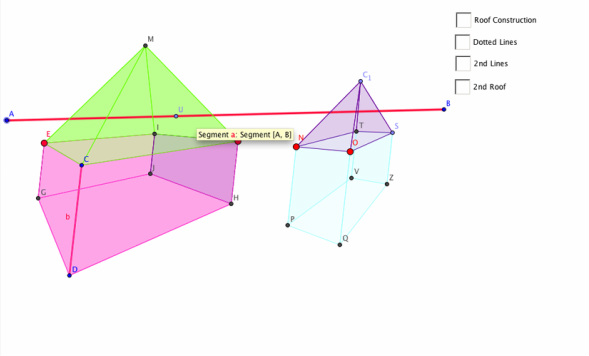
|
One Point Perspective GeoGebra Lab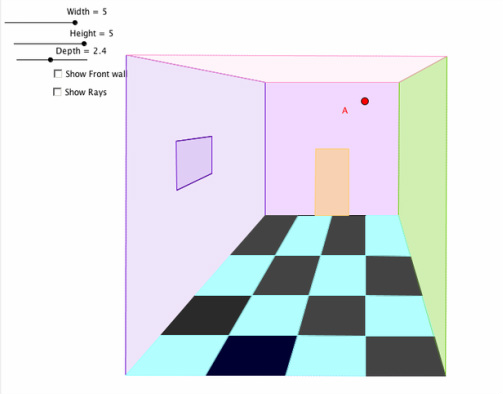
|
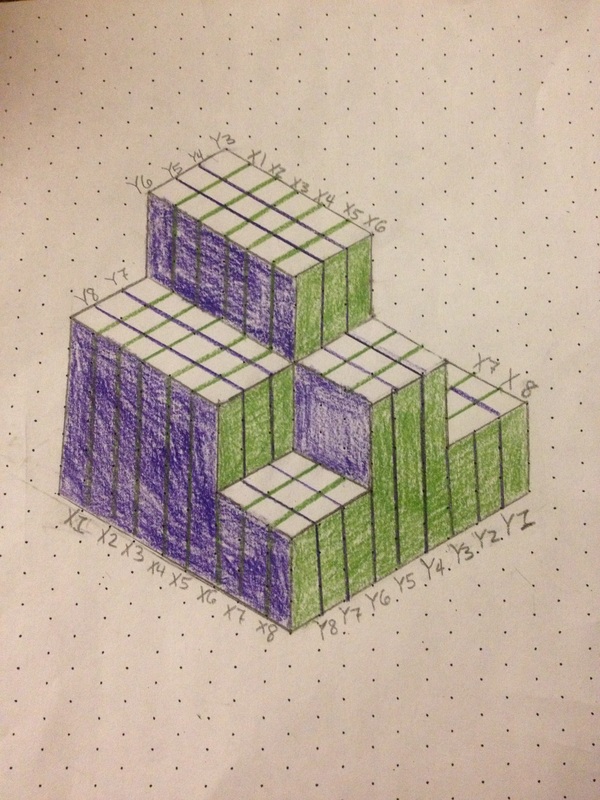
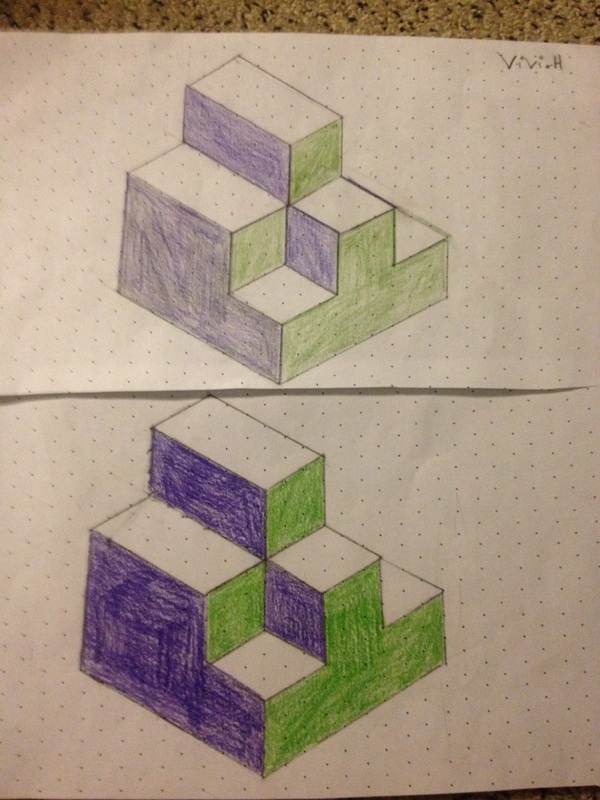
Visualizing 3-D Objects in Different perspectives

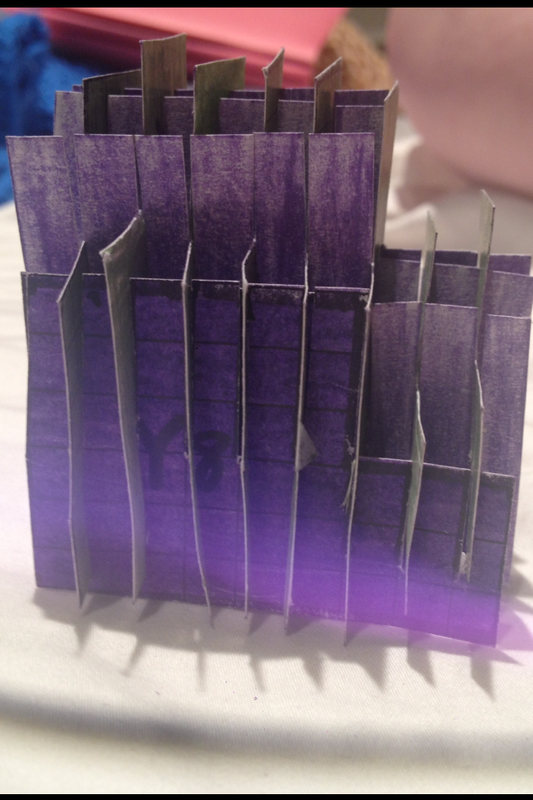
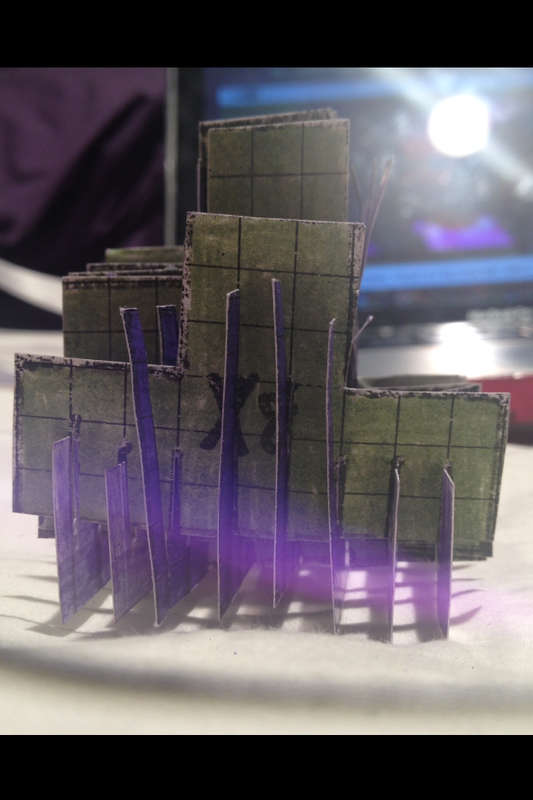
My Anamorphic 3-D Drawing Project
|
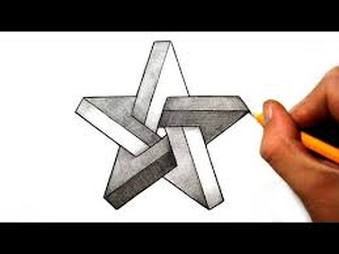
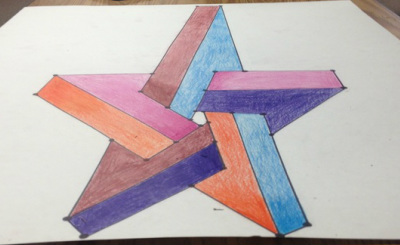
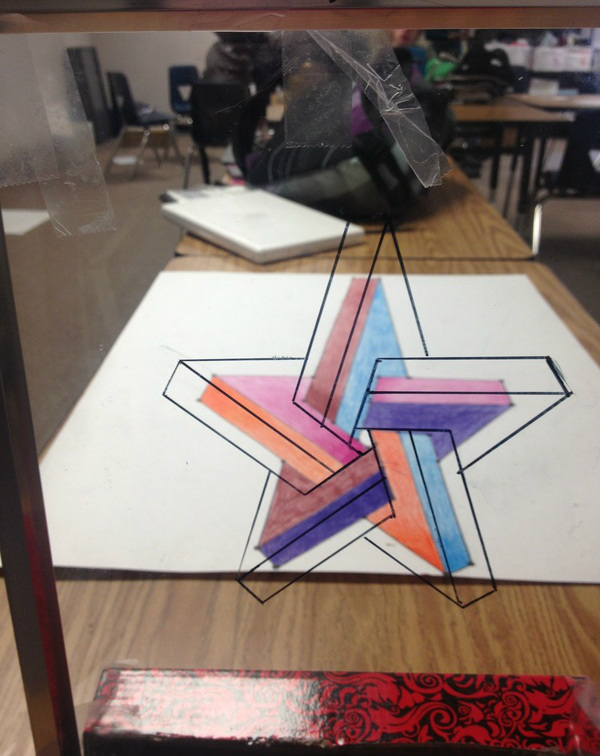
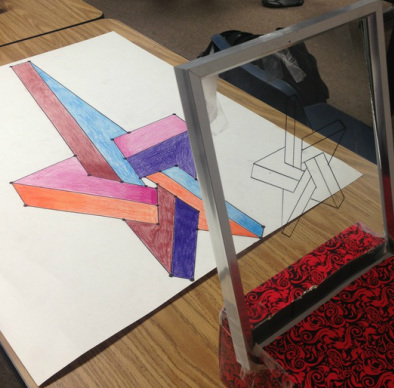
1. Anamorphic images are the projection of an original image to a bigger scale image, only visible from one set point. If one is looking at the picture from the side it does not appear as a three dimensional star, but if looking from the one point perspective one can very easily see the star. 2. For my partner and I to create our anamorphic drawings we required many supplies. First too set up we cut a chunk out of a shoebox to make a platform to hold half a picture frame. With the picture frame we traced the original image on it. You can see this in the 3rd and 4th picture down. After this we used a laser pointer to point out where the points should go on the white poster board. Other supplies we used were ruler, sharpies, and erasers. 3. The anamorphic drawing is a result of projection since it involved projecting the original image on the picture frame to a poster board far away to create a three dimensional image. To create our drawing we used a laser pointer to match up the original images and points with the poster board while the other partner drew a very precise dot were ever the laser pointer was pointing. Then we connected all the dots together with a ruler to form the actual shape. Then we connected all the inside details to make it look three-dimensional. After this we went over all the lines with a ruler and a thick sharpie. For the final step we colored and shaded our anamorphic image. 4. The only challenge my partner and I come across was aligning out original image up with the projection on the poster board correctly. We overcome this by taking our time and very carefully projecting our image. Also we had an issue with deciding whether or not to color our project with colored pencils or to shade it with pencil. We in the end just thought about the decision and decided on color. |
|
Measuring Height and Equations

|
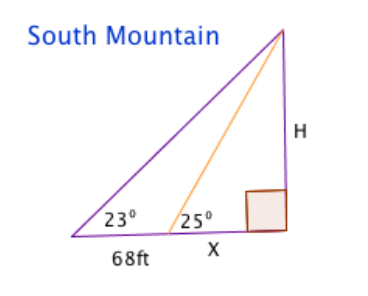
Tan 25 h Tan 23 h
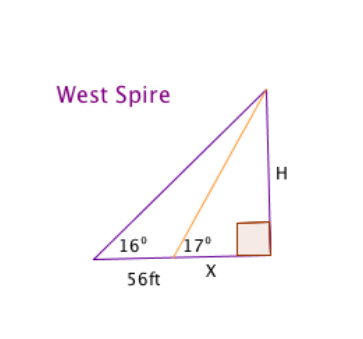
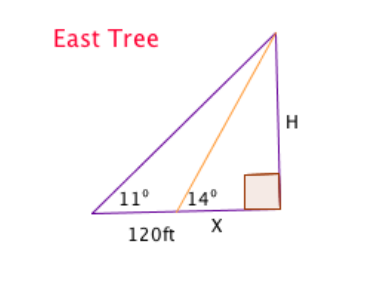
1 = x 1 = x h=( Tan 25)x h=(Tan 23) (x+68) h=x·Tan23+68·Tan23 x·Tan(25)=x·Tan23+68·Tan23 x(Tan25- Tan 23)=68·Tan23 x=68·Tan23/(Tan25-Tan23) h=68·Tan(23) Tan (25)/(Tan25-Tan23) +5 H = 326.748 Tan 17 h Tan 16 h 1 = x 1 = x+56 h=Tan17x h=Tan16(x+56) Tan17x=Tan16(x+56) Tan17x=Tan16x+56Tan16 Tan17x-Tan16x=56Tan16 x(Tan17-Tan16)=56Tan16 x=56Tan16/ Tan17-Tan16 = 845.798 · Tan17+5 H = 263.5866 Tan 11 h Tan 14 h
1 = x 1 = x+120 h=Tan11x h=Tan14(x+120) Tan11x=Tan14(x+120) Tan11x=Tan14x+120Tan14 Tan11x-Tan14x=120Tan14 X(Tan11-Tan14)=120Tan14 X(Tan11-Tan14)=120Tan14 x= 120Tan14 /(Tan11-Tan14) = 544.506 H=110.841 |
|
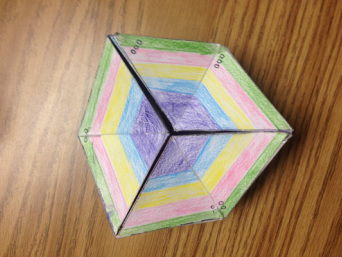
Hexaflexagon
|
My hexaflexagon as you can see to your right uses both rotational symmetry and line reflection. As you can see the hexaflexagon reflects itself six times in the six different pairs of triangles. It shows rotational symmetry by rotating sixty degrees to each of the six triangles.
Hexaflexagon Reflection Personally my favorite part of my hexaflexagon is how I colored it. It looks rather amazing l when you flip it around. On one side I have an organized rainbow effect, and the other squiggle lines that are colored in various bright colors. Another one of the other sides is just random colors molding into each other, and the other is random colors and triangles reflecting each other. If you look at it just right you can also see boxes on that side as well.
If I could change my hexaflexagon I would do a lot differently. First of all I would draw the whole completely differently I would make it so each triangle reflected each other. I would also use the same colors on each side instead of choosing a ton of random colors. Last I would spend more time making it beautiful instead of hurrying to color it and get it done. I learned that I need to slow down with my work on this small project. I hurried on it and it did not turn out as well as I wanted to. |

|
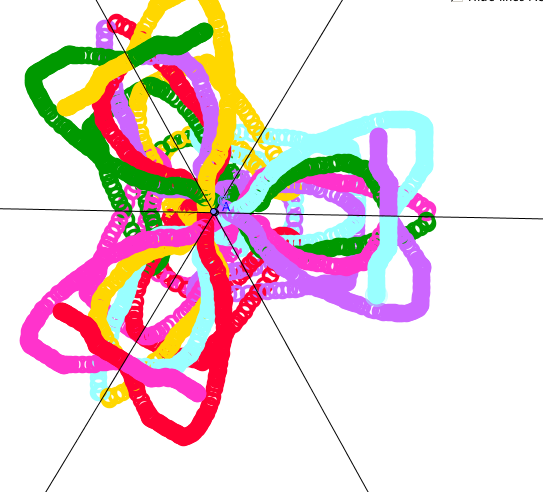
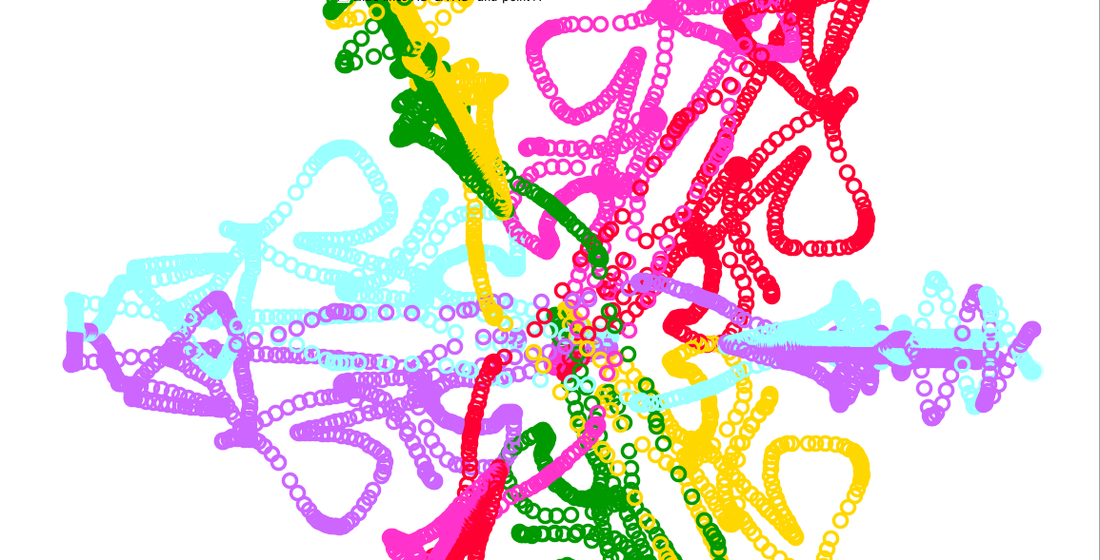
Snail-Trail Graffiti GGB Lab
|
In this exciting and colorful lab we used basic rotational symmetry and reflection. To make the snail trail lab we first made a circled, and then divided it into 6th parts. Then we put one mini circle in one of the sections, and reflected it over the line into the next section. We reflected the mini circle until all the section were filled. Then we changed the color of each mini circles, and turned the trace on to make the beautiful colorful blob you see to your right.
During this project I learned that math can be fun and artistic, but most of all colorful. Before I started taking geometry I had no idea that art and math could go together, but they do and I enjoy it so much. I also learned that if I'm patient and try my hardest I can do anything. Mostly I'm not patient and I end up doing it wrong. |
|
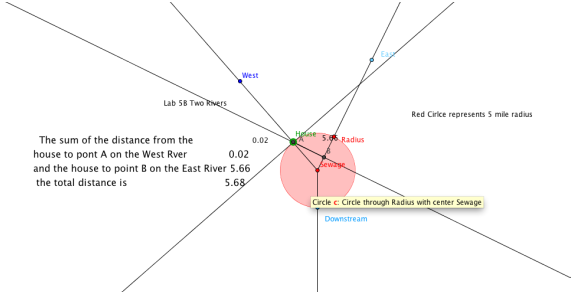
Two Rivers GGB Lab
There is a sewage treatment plant at the point where two rivers meet. You want to build a house near the two rivers upstream from the sewage plant, naturally), but you want the house to be at least 5 miles from the sewage plant. You visit each of the rivers to go fishing about the same number of times but being lazy, you want to minimize the amount of walking you do. You want the sum of the distances from your house to the two rivers to be minimal, that is, the smallest distance.
|
This location is not acceptable because it is two far away from either river and the goal was to be nearest to a river as possible. The geometry referred in the problem includes the sum of a distance to a point to a line. We used a distance formula to calculate the distance between the two points.
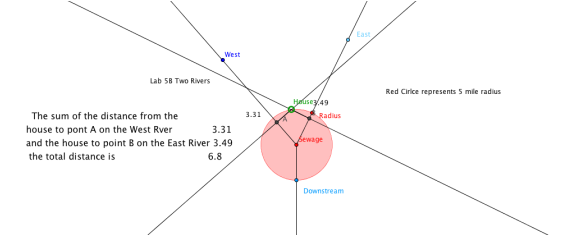
This location is acceptable because it is the shortest distance from a river, which we found out using a distance formula. It is also the radius of the circle.
|
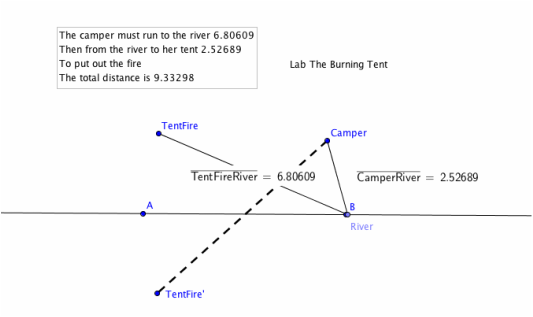
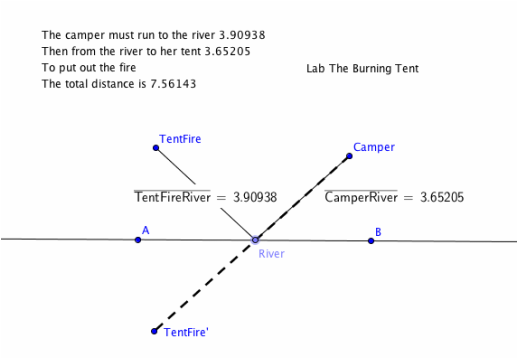
The Burning Tent Lab
|
A camper out for a hike is returning to her campsite. The shortest distance between her and her campsite is along a straight line, but as she approaches her campsite, she sees that her tent is on fire! She must run to the river to fill her canteen, and then run to her tent to put out the fire. What is the shortest path she can take? In this exploration you will investigate the minimal two-part path that goes from a point to a line and then to another point.
The geometry concepts used in this lab includes the line from the tent fire to the camper is a line of reflection of the tent fire to the river, and the distance between the two points was calculated by the distance formula. Also it includes the line from the tent fire to the river is perpendicular from the line from the tent fire to the camper. |
This location does not satisfy he requirements because the tent to point B is the same distance as the tent fire to the camper. The line from the tent fire to the camper is a line of reflection of the tent fire to the river. The distance between the two points was calculated by the distance formula.
This location is acceptable because the river is the minimal distance between the tent fire and the camper. The line from the tent fire to the river is perpendicular from the line from the tent fire to the camper.
|
